Example - Importing a Graph
Suppose you want to use the following plot in a document.
t = 0:pi/100:2*pi; y1 = sin(t); y2 = sin(t-0.25); y3 = sin(t-0.5);
h = plot(t,y1,'-',t,y2,'--',t,y3,':');
The best graphics format to select for this plot is a vector format so EPS is used.
Adjusting Line Width and Font Size
The resolution of a computer screen is considerably lower than that of a printed document. Therefore, you may find it useful to adjust certain characteristics to improve the quality of the printed document. This example adjusts the width of the lines plotted and the size of the axis tick label font (LineWidth, FontSize).
set(h,'LineWidth',1)
set(gca,'FontSize',8)
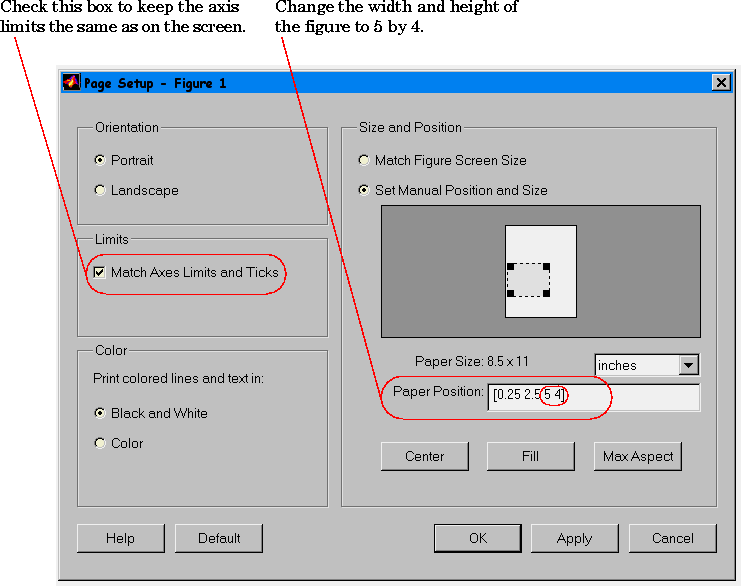
Specifying the Figure Size in Your Document
This example creates a figure that is five inches wide and four inches tall in the word processor document. To do this, set the PaperPosition property from the Page Setup dialog box. Also, to preserve the axis tick marks spacing used in the original figure, check the Match Axes Limits and Ticks option in the Limits section of the dialog box.
Export the Figure to a File
To apply the Page Setup dialog box settings, click OK and return to the MATLAB command window, then issue the print command to create a color EPS file with a TIFF preview.
print -depsc -tiff filename
MATLAB adds the .eps extension to the file name specified: filename.eps.
You can now import the file into the word processor application. For example, in Microsoft Word, insert a frame and then insert the picture into the frame. Avoid using the Word picture editor once the graphic is imported.
[ Previous | Help Desk | Next ]